Sunday, March 10, 2013

Maxi Skirt Remake

Eons ago, I competed in a Rodeo Queen contest. (Actually, it was eleven years ago.) The speech and interview component required a dressy western outfit. So, my mom and I chose a lovely black skirt with star accents in the form of buttons. A couple of years later, I purchased a burgundy skirt in a similar style. Both skirts fell just below mid calf on me. Unfortunately, ten years later, that is no longer the style. However, maxi skirts/dresses are very popular. I did some searching on Pinterest for a dress similar to what my skirts would look like if I put them together. Here is what I found:


Colorblock Maxi Dress
Revolve $195

I thought, "I can do this. I can just take apart the skirts and sew them back together in a pattern of black, purple. It will be easy." HA! It was kind of simple, but very time consuming. It took me a week of using a couple of hours in the evening to remake the skirts. This is what I started with. 


I began by ripping out the seams to so I could insert a couple of purple strips in the midst of the black. I also took off the buttons on the black skirt and the lace/ruffles on the burgundy. I chose to use black for the top because it had much higher quality elastic in the waist. After HOURS of using the seam rippers to painstakingly take out the seams, I could begin to sew. The sewing took a long time as well--pin, sew, pin, sew, repeat. Finally, at the end of the week, I had my finished product:


I love the way it turned out! The skirt is a great length with heels. It goes well with the sweater I have on in the picture, a button down black shirt, and a peasant top I like to wear during warmer weather. I can't wait to wear this remade skirt out sometime! My husband assured me it looks great-like I purchased it this way from the store.

Saturday, March 2, 2013

Peanut Butter Chocolate Chip Granola Bars

Granola bars have always been a big hit with my husband.I love these bars-they are kind of like s'mores with peanut butter and coconut add-ins. These bars are perfect for hauling along to a horse show or trail ride, or just to eat as a snack.


I discovered this recipe in high school, but I tweaked it for microwave use. You can also add in or leave out ingredients as desired. (I frequently omit the coconut and peanut chunks.)


To get started, place 1/4 c. butter, 1/4 c. vegetable oil, and 60 large marshmallows in a large, microwave-safe bowl. Cook for 2 1/2 minutes on high. Stir. Cook for another 2 min on high. Add 1/4 c. honey and 1/4 c. peanut butter. 
Cook for another 2 min, or until all marshmallows are softened. Watch this closely-DO NOT overcook your marshmallows. Stir again when you remove it from the microwave. Make sure all the marshmallows are melted and the mixture is smooth.


Add in 5 c. quick-cooking oats, 4 1/2 c. Rice Krispies, 1 c. crushed graham crackers, 1 c. coconut,  and 1 c. peanut chunks. Stir. (Make sure all of your ingredients are ready to go. If you wait too long to mix, the marshmallow mixture will cool too much to be easily stirred.)

Spread in a 9" x 13" pan for thick bars or a 15" x 10" pan for a more traditional bar. I opted for thick bars. Sprinkle mini chocolate chips on top and press them into the bars. Let cool slightly before cutting in order for the bars to harden.


Recipe:

1/4 c. butter
1/4 c. vegetable oil
60 large marshmallows (1 1/2 pounds)
1/4 c. honey
1/4 c. peanut butter
5 c. quick cooking oats
4 1/2 c. Rice Krispies
1 c. crushed graham crackers
1 c. coconut
1 c. dry roasted peanuts, chopped
mini chocolate chips for sprinkling.

Soften the butter, oil, and marshmallows in the microwave for 2 1/2 minutes on high. Stir. Cook for 2 more minutes on high. Add honey and peanut butter. Cook for 2 more minutes, or until all marshmallows are melted. Stir until smooth. Add oats, rice cereal, crackers, coconut, and peanuts. Spread in a 9" x 13" or 15" x 10" pan. Sprinkle chocolate chips on top and press into bars.

Friday, March 1, 2013

Boot Socks-Old Sweater Remake

After a series of snow days, thanks to winter storms Q and Rocky, I had clothing remakes on the mind. I spent several hours one day remaking a men's shirt into a halter top and altering the sides on a few other tops. 
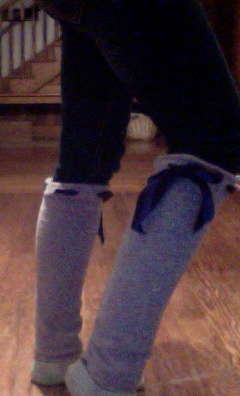
I happened to be wearing an old sweater while I was looking for clothing remake ideas. The fabric was snagged in a few places and the edging was tearing away from the shirt. I decided to wash the sweater, hack off the sleeves, and make boot socks with the old sleeves. I did some 'Pinterest Research' on remaking sweaters into boot socks and found a cute idea for edging the top in a coordinating ribbon. They turned out so cute! I can hardly wait to wear them. (If you want to make your own, simply cut off the sleeves off an old sweater and hem the cut edge.)

Wednesday, February 6, 2013

Buffalo Ranch Chicken Wings...err...Legs

I can't help it that wings were not on sale last time I was at the store. Really. I have no control over that whatsoever. So....there really was no option but to use the chicken legs (instead of wings) for one of my favorite roasted chicken recipes. Besides, who can resist a good drumstick? Anybody remember fighting over the KFC drumsticks when you were a kid?

Photo from Taste of Home (see tasteofhome.com)
So, anyway, I altered a Taste of Home recipe to meet my needs. (The pic is of their chicken wings, NOT my chicken recipe.) I hustled to mix up the marinade in the morning...melt the butter, pour some hot sauce in a bag, add the vinegar, add the melted butter, add the chicken, done! The chicken hung out until I finished work, cared for the noble steed, finished updating grades, etc. Then I laid it out on a greased pan, sprinkled generously with ranch dressing mix and lightly with paprika. It baked for about an hour-and PRESTO! Dinner was finished when I added the green beans I had steamed while the chicken was baking.


Roasted Buffalo Ranch Chicken Recipe
(Based on TOH's Spicy Ranch Chicken Wings):

4 lb. chicken legs
3/4 c. hot sauce
1/4. c. melted butter
3 T. white vinegar
1 pkg. ranch dressing mix (1 1/2 T.)
3/4 t. paprika

Mix the hot sauce, melted butter, and vinegar in a gallon bag. Add the chicken legs. Let the chicken marinade for 4-8 hours. Preheat oven to 350 degrees. Place chicken on a greased 15"x10" pan. Sprinkle with ranch dressing and paprika. Bake, uncovered, for 50 min to 1 hour.

Monday, February 4, 2013

The pipes, wires, and other misc. items a bathroom requires

Be forewarned...you will probably want to leave most of this shopping up to Darling Husband. Or, if your husband is not house handy, your contractor for this job. There are a few decisions...PVC vs. copper water lines, size of wiring, etc. Seek the advice of several store experts before purchase. If all else fails, buy everything you might need and return what you don't use.

Now, we had already chosen what we liked for floor tile. We found several boxes of 18" by 18" tile at a Lowes that was clearing them out. There was just enough for our floor plan. (Exciting news, we found the same tile at our local Lowes in case we need to get another case or two!) See photo at left. So, now the question was, do we get the 1/4" thick Hardie backer board, or the 1/2" thick board? Based on the large size of tiles and the need for stability between the floor joists, we decided to go with the 1/2" thick board. We DO NOT want anything to crack! We also purchased the special screws for the board-1 5/8" long so it will penetrate both the Hardie board and the 3/4" subfloor. Backer board tape...an unnecessary waste of money. Both the thinset and and grout will provide a barrier/glue to prevent movement, so the backer board tape is just an extra.

Although some sources claim the moisture resistant sheetrock is no better than regular sheetrock in a high moisture environment (like a bathroom), my father-in-law put it in his bathroom with great success. My parents' bathroom has regular sheetrock, which is peeling, bubbling, etc. So, my husband insisted we invest in the moisture resistant stuff. (It's not that much more money, and hey, if it makes a difference.....)

The most excited thing we purchased so far--a door. I went to pick up shims at Menards...and, well...they were right down the aisle from the doors...so I picked out a lovely, unfinished, 6 panel door. The pic is of their Oak finish door. I went with the unfinished so I could have it dark on the bathroom side and light on the other. If I had purchased the Oak finish, I would have left the one side oak, buffed the other with sandpaper, and used gel stain to darken it. I also chose a nice lever style doorknob with a brushed nickel finish for the lock. The old-fashioned knobs would not work in this new door, so instead of matching the old house, I decided to match the fixtures in the bathroom to the doorknob.

Now, just put it all together!


Saturday, January 26, 2013

Pizza...the Perfect Finish to a Good Ride

Pizza...in less than 45 min.


I love pizza....even the greasy, cardboard-crusty stuff they served at the college cafeteria. The only things I don't like about homemade pizza are the cost (why make my own when Little Caesars will sell us one for $5?) and the time. So many homemade crusts require a rising time...and premade crust is at least $2 a can. That's almost half the cost of a Little C's pizza! Anyway, I found a recipe that can be made in 40 minutes (give or take 5 min) which allows me to throw it in the oven after riding.

Preheat the oven to 400. While it's heating, make the crust:

2 1/2 c flour
1/2 t. salt
1 pkg. yeast

Mix those and make a well in the center. Add:

1 c. lukewarm water
1 T. olive oil

Mix well. Spread in a greased 9x13 pan. (I recommend investing in Pampered Chef pans. They are SO heavy and durable. You won't regret it!) Let the dough rest for 10 min and pop it in the oven to bake for 5 min. While it is baking, pull out some mozzarella cheese, pepperoni, and pizza sauce. I used this time to make my own sauce. I used 1 8 oz can tomato sauce and 1 tsp marinara spice blend (from Market Spice).

When the crust comes out of the oven, coat it with sauce, put on about 4 cups of cheese, and add some pepperoni. Now for the good part. Lightly sprinkle with black pepper, generously sprinkle with oregano, and drizzle with about 2 tsp. olive oil. Bake for 15-20 min.


Awesome result--melt in your mouth and perfect seasoning. The perfect dinner after the perfect ride.

Bathroom happenings....

This winter we are working on remodeling (well, let's just say 'adding') our 3rd story bathroom. Why do I call it 'adding' a bathroom? Well, let's just say that referring to the space up there as a 'bathroom' was using the term loosely. Yes, there was a toilet, sink, and vanity mirror. These amenities were separated from the rest of the room by a half wall and...no door. The reasoning (a door was too much trouble?) the space had been used as a master bedroom. The couple apparently decided to eliminate midnight trips downstairs for the, ahem, facilities. My husband and I, on the other hand, much prefer the space on the 2nd story for our master bedroom. So....we decided to rip out the existing fixtures and wall, add a full height wall, and replace the half bath with a shower, new sink, and new...umm...crapper.

I will post pics when it is done-for now-what do you think of my shower inspiration? I found it in lowes.com gallery of pictures...check out their website for some great ideas!


Our layout is simple: door in the middle, shower on right, sink and toilet on left. Across from the door are three windows (which will be frosted to prevent peepers!) They will add lots of light to supplement the two additional lights we plan to add. The windows have original woodwork and some gorgeous crown molding. They have been a little dinged up and had a few paint splatters from somebody being sloppy. (It wasn't us, I swear.) After I lightly sanded a piece to get the paint off, I applied Miniwax Gel Stain. That stuff is awesome! I ended up brushing it on the entire piece. When spread thin it showcases the natural wood grain. When applied more thickly, it covers the paint splatters/drips, so NO sanding required!


The gel stain is Walnut over our house's original wood...I believe it is American Mahogany... but it could be something else. The dark finish is what it originally had, but someone had stripped the original finish, leaving a lighter wood. We prefer the original look, so we are trying to go back to that.